Friday, December 9, 2011

E.D.C. Every Day Carry

Continuing on with my tool theme I thought I would post my list of Every Day Carry items.... Most of the time I carry the following on my person..
Click for a larger image

In the shoulder bag I carry the following..

  • Agfa Waterproof Camera 12MP (waterproof to 3mt for 30 minutes)
  • Yaesu Dual-band Ham Radio with wide-band receiver and Belt clip with Nagoya Antenna Waterproof to 1mt for 30 Minutes
  • Headphones noise cancelling
  • Niteize S-Biner for keys Mini LED torch and memory stick
  • USB SD card reader with micro SD adapter to download camera photos (Not Shown)
  • Bluetooth headset
  • Two Notebooks one for permanent notes and one to tear out pages
  • Fisher Space-pen (Black Bullet) with Black ink Medium point
  • Gel pen Blue Fine Point
  • 4 colour click pen
  • Hand Speaker Mic for radio

On my belt I carry the following

  • Led Lenser Police Focus torch 115 lumens
  • Leatherman Wave with blade removed (Due to Laws on carrying blades in Victoria)
  • Screwdriver Bits for leathermen
  • Handmade Leather wallet on chain (I ride a motorbike and don't want to lose my wallet)

And I wear a a fishing vest as my motorcycle vest, that's how I got my nick in real life of pockets, it has 14 pockets including one on the back that can hold my net-book, here is what I carry in the vest pockets

  • Sunglasses with safety lens' (for my bike I don't want a stone in the eyes) yellow mirror tint
  • Green Maglite Solitaire torch (Not shown)
  • Green Aluminium Signal whistle (Not shown)
  • Tobacco and Black Zippo lighter with spare flints
  • Sometimes an MSI Wind Net-book
  • in Ear air tube headset for Yaesu radio (not shown) for use on the motorbike

Finally I also wear the following items

  • Huawei Ideos Mobile phone on lanyard around my neck (Android) I am a Google addict :)
  • Orient Automatic self winding analog watch set to UTC (haven't had to wind it in 4 years)

Maglite Purchase

Well I am at it again... I have a thing for torches, well not just torches but tools in general and I see torches as a tool. I have a Led Lenser Police Tech Focus with 115 lumens of light output. This is one of my main torches and I carry it with me most places I go.

Led Lenser Police Tech Focus


Green Maglite solitaire
 I also have a Black 3D Cell Maglite in the car for breakdown use as well as a Maglite solitaire attached to my motorcycle vest.
3D Cell Maglite


I have just got a 6D cell Maglite in red which is the largest maglite they make. It weighs 3.1 kilos and is 48cm long. A formidable torch.
 I have also bought the following accessories for the red maglite. The first is a tail cap with glass breaking tip for breaking automotive glass. Second is a crenelated  strike bezel, I have also got a terralux 700 lumen Cree LED module and a belt loop.

Glass Breaking End Cap
 

Crenelated Strike Bezel
Terralux Module
Belt loop

Thursday, November 3, 2011

70cm (440mhz) Yagi up and installed

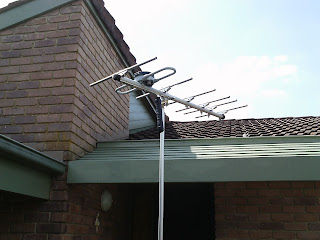
Well I finally took the plunge and got my two sons up on the roof today and we installed my new beam antenna for 70cm or the MHz band. The antenna is a 20 element 18 directors one driven dipole and a reflector. It has a total length of 3.64 meters.

Unlike a television antenna I have mounted this one vertically with the elements running up and down as I am using it on FM in to repeaters with vertical antennas. I had to make up my own gamma match and used a 4:1 match for it made from coax.


The lowest antenna just above the roof line in the pic  is a UHF antenna for our country TV, the middle one is a VHF antenna for Melbourne TV and the top most is my Yagi on a rotator, the rotator is the bulge in the pole just below it. With this set-up I can hit the repeater at Arthur's seat 83 km away on 1 watt and the Cranbourne repeater 50 km away on 300 milli watts but with a lot of noise so I use 1 watt as well, this is better then before I had to use 5 watts in to my vertical for Cranbourne and couldn't hit Arthur's seat at 5 watts on the vertical at all.

Saturday, October 22, 2011

Growing up as a Geek

My Brother and I on our BMX's circa late 1970s in Rabaul East New Britain PNG


I was born in 1972 as the elder of twins, early on in my life we moved to Papua New Guinea (PNG) North of Australia where my dad was working for Steamships Trading Company or Steamies. They had a major retail presence in PNG and sold all manner of things from food to white goods.

It was a great youth, growing up with out the modern shackle's of a protective society, we would disappear in to the bush for the day with a picnic and a sense of adventure. The other bonus was my Dad was a buyer for Steamies and we always had Reps from Asian companies coming out to see him, they would routinely take us out to dinner and bring gifts for the family. As was the case many of these gifts seemed to be early electronic toys that in some cases were not even available in Australia but had been bought in straight form Japan.

I remember having an early LCD boxing game that had controls on two sides and you you could punch block or crouch, many hours were spent smashing our opponents in to submission.  Later we moved back to Victoria and we stayed with my Mum in a caravan in my grandparents backyard. This is where I got my first introduction to the hacker mentality of Reuse, Recycle and Re purpose. This lesson came in the way that Opa (My Dutch Grandfather) would let us make things out of wood, he had jars of nails on the shelf but if we wanted to make something we had to remove used nails from scrap timber and straighten them on the anvil for reuse. Even later in life my grandfather rebuilt old 10 speed road racer bikes for Christmas, we would go to his home and help him to repair the bikes including resprays and complete overhaul. They even had BMX handle bars so in a way were pre-curses to a mountain bike lol.

I remember getting teased at school that we had recieved second-hand bikes for Christmas, but what I realised later (when I was about 35yo) made me forget all the teasing. The knowledge I gained and the outlook of recycling stuff all came from Opa and for that I am ever grateful. I rang him at that time and thanked him for the time he had taken to impart his knowledge on to me.

He always had all his tools up on pegboard and would know right away where something was. I don't use pegboard in my shack but I have 5 toolboxes (large ones) and a filing cabinet outside for tools and with over 1500 hand tools I know where everything is right away. I am a mad collector of tools because I know that with some scrap and the right tools (sometimes even the wrong tools) you can make something with your own hands, this is a skill I will always thank Opa for.

Later on my step dad was doing an IT course in the mid to late 80's and he bought an Commodore SX64 for his course, I seem to remember him doing a horse betting odds program for his thesis, this was my introduction to hands on computing, I had seen an early 8bit at my uncles house as he was an IT teacher at Ballarat TAFE and had also seen the mainframe with terminals thee that they had recovered from a bank when it became obsolete.

I entered a science comp through high school and came second with a scanning keyboard activated by a single switch on the C64. It would output straight to a printer and did not have any control of the PC, it was just a glorified typewriter for the disabled, I called it the crocodile typewriter.

In my adult life I worked in many jobs, usually to acquire skills to help my self like mechanics so I could fix my own car as I didn't have lots of cash. I don't hold any tickets but have worked in the following areas either as a hobby or as a job.


  • Clutch and Brakes
  • Auto electrical
  • Agricultural Mechanics including hydraulics
  • Amateur theatre to acquire skills in lighting and sound
  •  Retail Sales
  • Food preparation and restaurant management
  • PC repairs
  • Basic Networking
  • Basic electronics
  • Panel beating and spray painting
Now I am not working due to injury from a motorbike accident and I like to tinker, I am a self proclaimed hacker in to electronics and Linux. I am a biker and love to ride my rat bike around the hills in my local area and my latest achievement was to get my HAM radio licence. Oh and I am a geek and proud of it ..........

Wednesday, October 19, 2011

Bench Power supply from PC ATX supply

I have started to make a bench power supply from an old mini ATX power supply. The supply is really small and does not have room in the case to mount the binding posts for the outlets or the fuse holders for the voltage rails. I am going to mount the supply in to an ABS plastic case but still keep it in its own steel enclosure to restrict RF from the switch-mode.

Here is a pic of the first stage of the Hack, removing all the excess power wires, the supply is on the right with the excess wires removed on the left.

I will be able to have +12VDC at 20A , -12VDC at 500MA, 5VDC at 30A and 3.3VDC at 18A.

Inline fuses in all the rails will be fitted to protect the supply. I have wired the Soft switch of the supply permanently on as I will have a Hard switch in the Mains AC input so that I don't use any power while the supply is just sitting there. An ATX supply supplies 5VDC even when it is 'off'.

I will also be fitting a variable voltage regulator based on an LM317 in to the case from the 12VDC rail to give me variable voltage, this will also have a Voltage meter (analog panel meter).

I have hooked up an 8.2Ohm 10watt resistor across the 5VDC rail to ground to load the switch mode as one of two things will happen if you don't, first some supplies will fail to power up if not loaded and some will give stray high voltage (ie Mains) out, there is also the in built fan on the supply to load the 12 volt up.

 Here is a pic showing the large ceramic 10watt resistor fitted in to the supply.

I have just been on to eBay and am going to order some banana sockets, a panel meter, fuse holders and the ABS case to mount it all in to. I already have some nice little rubber feet to mount to it.

The supply on the test bench the meter on the right is reading the +12VDC rail and I was getting 12.06 volts and the one on the left is the +5VDC rail at is at 5.14 volts.

I will be hard wiring the supply with a mains lead and get rid of the C13/C14 connection normally used on a PC supply.

Sunday, October 16, 2011

Portable 70cm Yagi

I had a go at building a small (apx 1mt long) 6 element yagi with a folded dipole. It is designed with a handle for hand held operation in Radio Direction Finding activities and to be mounted to a small mast I have that extends to about 2.5mt high for QRP operation.

Here is a shot of the mast and aerial collapsed to fit in the trailer I am building to go behind my motorbike.

 A shot of it set up on the mast which is freestanding

A close up of the yagi atop the mast

Tuesday, August 16, 2011

Home Network

Thought I would get around to mapping out the current network we have at home. So what do you think to much for a family of four ?

The Server in the shed is for offsite backup, so if the house burns down hopefully the shed doesnt :)


Sunday, July 31, 2011

The Rock Rat

Here are some pics of my 1981 XJ650 click on them for bigger images
painted in matt black with a brush


Mask on front guard


Straight through pipe four into one

Off road GPS

Tuesday, April 26, 2011

OSHW 780x Powersupply

Here is a little 780x based power supply circuit. It is released as open hardware, the zip file contains BOM, Overlay and Trace file as well as a diy file for use with DIYLC which you can find here http://code.google.com/p/diy-layout-creator/

The trace file in the archive has already been flipped over for laser toner transfer method of PCB manufacture. Have fun and remember this can handle a MAX of 1amp only if you have a heat sink on the regulator.

Here is the link to the files http://rapidshare.com/files/459232217/780xPS.zip

Friday, April 15, 2011

Razors

Some new pics of the shed


Infra-red Microscopy

I have been playing with my microscope. It is a stereo scope so I decided to see if I could hook up a webcam to it. I know you can buy webcam microscopes but I didnt want to spend any money if I could help it.

I had a web cam with no optics and the infra-red filter ripped out that I had hooked up to a zoom lens, I decided that as I could already see in the visible spectrum I wouldn't put the IR filter back in making it more sensitive to the IR from the incandescent lights in the microscope.

With a bit of mucking around I got the focal lengths for both the visible light side and the IR side set the same, this allows me to use one side of the scope as a wide view area (9.5mm) to centre the location to view in the IR field of view on the other eyepiece. The field of view for the IR is 1mm at 640*480 pixels

Here is the scope.

Field of view on IR. Black lines are mm scale on a micrometer.

Surface Mount LED showing junction.


Crystal on haceduino code AG.
I call this one the gold bar.

Mesh grid in a vacuum tube.

PCB trace lit from top.

PCB trace lit from below, good for finding cracks.

Friday, January 14, 2011

Cinelerra for Grandma
Basic HOWTOs for very beginners


How to compile CinelerraCV from source code on Ubuntu

Note Grandmothers are known to use x86 computers
Dear Grandma,
compiling Cinelerra means translating her source code (that is text written by the developers in a computer language) into a program you can execute and use.
To build Cinelerra from source code you need to use the command line.
That is, instead of clicking on icons you are going to talk to your computer writing weird words: commands.
To run a command, open a terminal (Applications → Accessories → Terminal), type the suggested command (copy by mouse highlighting and paste by middle mouse button clicking) and press ENTER.
Compilation is made in 5 steps:

1. Get the source code

The Source Code of Cinelerra CV is a multi-developer project. The Community of developers use GIT, a distributed Version Control System program for managing multiple revisions of the code. The Source Code of Cinelerra CV is in a git repository hosted by a German server.
To get a copy of the source code, you first need to install git. In Synaptic go to the menu Settings → Repositories and make sure you have enabled the components called main, universe, restricted, multiverse.
Then use this terminal command:
sudo apt-get install git-core
To fetch the source code type the following command:
git clone git://git.cinelerra.org/j6t/cinelerra.git cinelerra-cv
This command downloads a copy of the source code of Cinelerra-CV from the German server. It will appear as a folder in your home directory (or your current working directory) named cinelerra-cv.
If you already have the source code from the git repository, you only need to update it. Use the following commands:
cd cinelerra-cv
git pull

2. Get the dependencies

a - Install the compilation tools

You need some compilation tools installed. Type:
sudo apt-get install build-essential autoconf automake1.9 libtool nasm yasm gettext
Note Also knowledgeable grandmas need compilation tools!

b - Install the libraries

You need also many libraries installed. Cinelerra depends on them. Their names vary depending on distribution. Copy and paste one of the following looooong commands, depending on your distribution:
For Maverick 10.10, Lucid 10.04, Karmic 9.10, Jaunty 9.04 and Intrepid 8.10:
sudo apt-get install xorg-dev libasound2-dev libogg-dev libvorbis-dev libtheora-dev libopenexr-dev libdv4-dev libpng12-dev libjpeg62-dev libx264-dev uuid-dev mjpegtools libmjpegtools-dev libfftw3-dev liba52-0.7.4-dev libmp3lame0 libmp3lame-dev libsndfile1-dev libfaac-dev libfaad-dev libesd0-dev libavc1394-dev libraw1394-dev libiec61883-dev libtiff4-dev libxxf86vm-dev libglu1-mesa-dev
For Hardy 8.04:
sudo apt-get install xorg-dev libasound2-dev libogg-dev libvorbis-dev libtheora-dev libopenexr-dev libdv4-dev libpng12-dev libjpeg62-dev libx264-dev uuid-dev mjpegtools libmjpegtools-dev libfftw3-dev liba52-0.7.4-dev liblame-dev libsndfile1-dev libfaac-dev libfaad-dev libesd0-dev libavc1394-dev libraw1394-dev libiec61883-dev libtiff4-dev libxxf86vm-dev

3. Build Cinelerra

Enter the cinelerra-cv directory by typing:
cd cinelerra-cv
Then run:
./autogen.sh
and
./configure --with-buildinfo=git/recompile --enable-mmx --without-pic
The option --with-buildinfo=git/recompile will add a notice in the Settings→Preferences→About window about the source version.
Now run:
make
This command will make your computer working for a while, giving you the time for a cup of coffee.
Note
In the unlikely event of you having a 64-bit system, the configure command must be shortened to:
./configure --with-buildinfo=git/recompile
To know if you have a 32-bit or a 64-bit system run this terminal command:
file /sbin/init
You’ll get ELF 32-bit or ELF 64-bit.

4. Install Cinelerra

Type:
sudo make install
One last command:
sudo ldconfig

5. Run Cinelerra

To run Cinelerra, go to Applications → Sound & Video and click on Cinelerra. Cinelerra will open with an error message. Ignore it or learn HOWTO approach it.
It is considered wiser to run Cinelerra from a terminal because, in the event of troubles, the terminal output can help you understanding the problem.
To run Cinelerra from the terminal just type:
cinelerra
Happy Editing, grandma!

How to uninstall the compiled Cinelerra

Open a terminal and type:
cd cinelerra-cv
sudo make uninstall

How to remove useless compilation files

During compilation the make command creates a lot of files. They are needed to build the program but once you have installed Cinelerra their only purpose is to eat your disk space. You can remove them with the command:
cd cinelerra-cv
make clean

Troubleshooting

For problems compiling or running Cinelerra see the Troubleshooting page.